Note: This post has been updated for changes in Cockpit 0.90 and later.
Cockpit is a user interface for servers. In earlier tutorials there’s a guide on how to add components to Cockpit.
Not all of the system APIs use DBus. So sometimes we find ourselves in a situation where we have to use REST (which is often just treated as another word for HTTP) to talk to certain parts of the system. For example Docker has a REST API.
For this tutorial you’ll need at least Cockpit 0.58. There was one last tweak that helped with the superuser option you see below. You can install it in Fedora 22 or build it from git.
Here we’ll make a package called docker-info which shows info about the docker daemon. We use the /info docker API to retrieve that info.
I’ve prepared the docker-info package here. It’s just two files. To download them and extract to your current directory, and installs it as a Cockpit package:
$ wget http://stef.thewalter.net/files/docker-info.tgz -O - | tar -xzf -
$ cd docker-info/
$ mkdir -p ~/.local/share/cockpit
$ ln -snf $PWD ~/.local/share/cockpit/
Previously we talked about how packages are installed, and what manifest.json does so I won’t repeat myself here. But to make sure the above worked correctly, you can run the following command. You should see docker-info listed in the output:
$ cockpit-bridge --packages
...
docker-info: .../.local/share/cockpit/docker-info
...
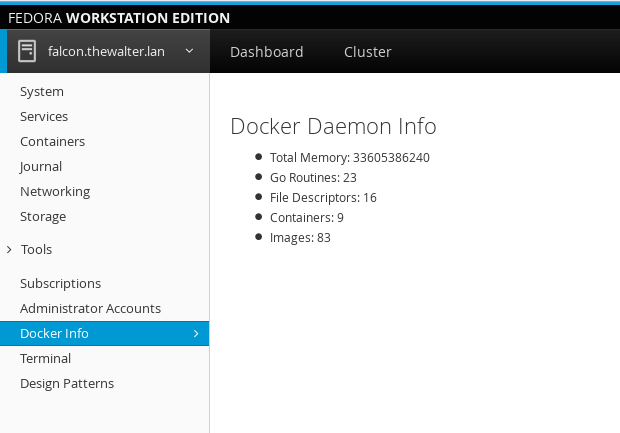
If you’re logged into Cockpit on this machine, first log out. And log in again. Make sure to log into Cockpit with your current user name, since you installed the package in your home directory. You should now see a new item in the Tools menu called Docker Info:

After a moment, you should see numbers pop up with some stats about the docker daemon. Now in a terminal try to run something like:
$ sudo docker run -ti fedora /bin/bash
You should see the numbers update as the container is pulled and started. When you type exit in the container, you should see the numbers update again. How is this happening? Lets take a look at the docker-info HTML:
<head>
    <title>Docker Info</title>
    <meta charset="utf-8">
    <link href="../base1/cockpit.css" type="text/css" rel="stylesheet">
    <script src="../base1/jquery.js"></script>
    <script src="../base1/cockpit.js"></script>
</head>
<body>
    <div class="container-fluid">
        <h2>Docker Daemon Info</h2>
        <ul>
            <li>Total Memory: <span id="docker-memory">?</span></li>
            <li>Go Routines: <span id="docker-routines">?</span></li>
            <li>File Descriptors: <span id="docker-files">?</span></li>
            <li>Containers: <span id="docker-containers">?</span></li>
            <li>Images: <span id="docker-images">?</span></li>
        </ul>
    </div>

    <script>
        var docker = cockpit.http("/var/run/docker.sock", { superuser: "try" });

        function retrieve_info() {
            var info = docker.get("/info");
            info.done(process_info);
            info.fail(print_failure);
        }

        function process_info(data) {
            var resp = JSON.parse(data);
            $("#docker-memory").text(resp.MemTotal);
            $("#docker-routines").text(resp.NGoroutines);
            $("#docker-files").text(resp.NFd);
            $("#docker-containers").text(resp.Containers);
            $("#docker-images").text(resp.Images);
        }

        /* First time */
        retrieve_info();

        var events = docker.get("/events");
        events.stream(got_event);
        events.always(print_failure);

        function got_event() {
            retrieve_info();
        }

        function print_failure(ex) {
            console.log(ex);
        }
    </script>
</body>
</html>
First we include jquery.js and cockpit.js. cockpit.js defines the basic API for interacting with the system, as well as Cockpit itself. You can find detailed documentation here.
<script src="../base1/jquery.js"></script>
<script src="../base1/cockpit.js"></script>
We also include the cockpit.css file to make sure the look of our tool matches that of Cockpit. The HTML is pretty basic, defining a little list where the info shown.
In the javascript code, first we setup an HTTP client to access docker. Docker listens for HTTP requests on a Unix socket called /var/run/docker.sock. In addition the permissions on that socket often require escalated privileges to access, so we tell Cockpit to try to gain superuser privileges for this task, but continue anyway if it cannot:
var docker = cockpit.http("/var/run/docker.sock", { superuser: "try" });
First we define how to retrieve info from Docker. We use the REST /info API to do this.
function retrieve_info() {
    var info = docker.get("/info");
    info.done(process_info);
    info.fail(print_failure);
}
In a browser you cannot stop and wait until a REST call completes. Anything that doesn’t happen instantaneously gets its results reported back to you by means of callback handlers. jQuery has a standard interface called a promise. You add handlers by calling the .done() or .fail() methods and registering callbacks.
The result of the /info call is JSON, and we process it here. This is standard jQuery for filling in text data into the various elements:
function process_info(data) {
    var resp = JSON.parse(data);
    $("#docker-memory").text(resp.MemTotal);
    $("#docker-routines").text(resp.NGoroutines);
    $("#docker-files").text(resp.NFd);
    $("#docker-containers").text(resp.Containers);
    $("#docker-images").text(resp.Images);
}
And then we trigger the invocation of our /info REST API call.
/* First time */
retrieve_info();
Because we want to react to changes in Docker state, we also start a long request to its /events API.
var events = docker.get("/events");
The .get("/events") call returns a jQuery Promise. When a line of event data arrives, the .stream() callback in invoked, and we use it to trigger a reload of the Docker info.
events.stream(got_event);
events.always(print_failure);

function got_event() {
    retrieve_info();
}
This is a simple example, but I hope it helps you get started. There are further REST javascript calls. Obviously you can also do POST and so on.